LTM Installation Guide
6 Min Read
17 Oct, 2021
How to Download and Operate the LTM App
We recently provided an overview of the LAVA Tablet Manager (LTM) app, which is used with our eSynC and eSTS SimulCharge adapters. We covered what the app does and why it is necessary for utilizing Network Recovery & Battery Modulation (RBM). This article will serve as an installation guide for LTM and walkthrough of the settings available within the application.
Installation Guide
You can download the latest version of the LTM app (5.04) from the Google Play Store or through the LAVA Software Release Package ( eSynC version / eSTS version), which includes copies of the manuals for the adapter.
Once installed, tap the LTM logo on your device’s home screen to launch the app. On the first screen, tap on “GO TO CONFIGURATION” and accept any pop-up messages that appear. You will then be taken to menu screen with the ability to control variety of different settings, including Battery Modulation, Ethernet and (screen) Brightness settings. For some features to work properly, the LTM app must be given permission to change system settings.
General (settings)
In this top menu, you can set the Product Family of the adapter being used. You need to make sure the right type of adapter is chosen or the implementation won’t work correctly. Similarly, the Protection Type needs to be matched to the tablet. The Protection Type menu offers a link to a list of compatible mobile devices and whether the setting should be configured to “Type 1” or “Type 2.”
This menu also includes a “Show LTM Notification” toggle switch. This will show the LTM logo in the mobile device’s icon bar when the app is running. If you turn the notification off, the icon still appears but is more transparent for a slightly cleaner look. Switching this notification on or off does not affect how the LTM app itself runs.
Battery Modulation Settings
Battery Modulation is a technology used in RBM-equipped SimulCharge adapters that protects the battery by keeping it from overcharging and bloating, which will damage it and the mobile device over time. The Battery Modulation Settings menu allows users to further configure the feature.
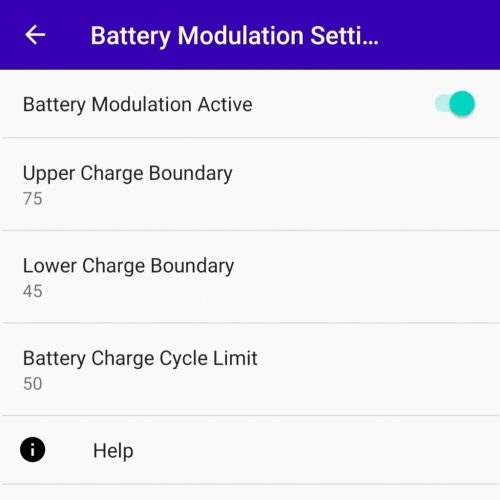
First, make sure the Battery Modulation Active toggle switch is turned on. Otherwise, you won’t be able to access anything else in the menu. You can set the Upper Charge Boundary and Lower Charge Boundary in percentages (between 20% and 100%). This will indicate to the adapter when the mobile device should stop and start charging. You can also set a Battery Charge Cycle Limit, which allows the user to set how many modulation cycles the battery will go through before it fully charges to 100%. You can choose between 4 and 9,999 cycles.
Ethernet Settings
In Ethernet Settings, you can turn Ethernet on or off, determine whether Wi-Fi should override the Ethernet connect, and set the Network Recovery intervals.
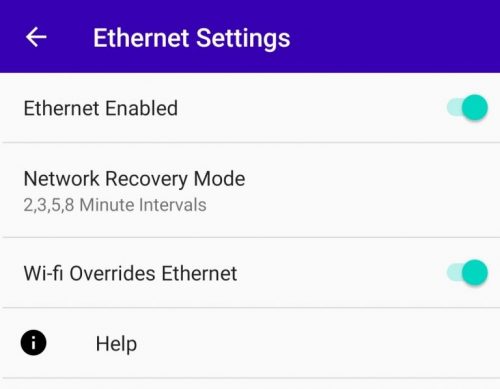
Network Recovery is another technology featured in RBM-equipped adapters that ensures the mobile device maintains a reliable wired network connection. When the device loses a wired network connection for more than a minute, this feature is triggered. In this menu, you can configure how often the mobile device tries to reconnect. Tap on Network Recovery Mode to choose either every two minutes or at an alternating pace of two, three, five and eight minutes. You can also disable this feature here, if you so choose.
Brightness Settings
Brightness Settings give you access to RBM’s Screen Brightness Management feature, which lets you set display brightness levels for day mode and night mode, and indicate when the mobile device should switch between these modes. This reduces heat generation from the display and conserves the battery. Like with Battery Modulation and Ethernet, you must make sure the Brightness Management Enabled toggle switch is on before you can access the other brightness settings below.
In this menu, you can choose to turn on Extended Screen Timeout. This setting will keep the display from turning off for 24.8 days, provided it is attached to a LAVA adapter.
USB Timeouts Settings
If the LTM app is shut down accidentally, it restarts after seven minutes using the recovery timeouts feature. This can be enabled/disabled in the USB Timeouts Settings. Though, it is recommended to never turn it off as there is no incentive to do so.
Debug Settings
LTM includes a Debug Settings menu for diagnostics, which can give status messages for the controller, brightness, charge, IP address, pass number and Ethernet. You can also set a file size limit for the diagnostic log file size and the time intervals between its updates.
Default Settings
If you run into major problems, you can restore all the settings to the default, through the Default Settings menu.
Switch to Background Mode
Once you have finished configuring all the settings, you should switch the device from the Configuration Console, the mode you’re in during installation, to Background Mode, so the LTM app won’t interfere with other apps on the mobile device.
To do this, tap on the three dots on the top-right of the app’s home screen and choose “Force to Background” in the drop-down menu. Now, the app will now run in the background. When in Background Mode, you can’t launch the LTM app with a single tap on the icon. However, if you double-tap the icon, the LTM app will restart, launching back into the Configuration Console and you can once again tweak the settings.
It is also recommended to power cycle the LAVA product when you make changes in the LTM app. Disconnect the adapter from the power source and then reapply power.
Hopefully, this article has given you a better understanding of how to configure the LTM app for use with your RBM-equipped adapter.