Screen Brightness Configuration Guide
4 Min Read
19 Sep, 2021
In an earlier article, we looked at the Screen Brightness Management feature, available with our RBM-equipped SimulCharge adapters. The feature lets users schedule a display brightness level for two different times of day – one for daytime operation and one for night time. This both reduces heat generation from the screen and saves on battery life. This article will provide a walkthrough of how to properly set up the Screen Brightness Management feature.
Screen Brightness Management is accessible through the Lava Tablet Manager (LTM) app, which must be installed on the mobile device ahead of time before using an eSynC or eSTS adapter. The latest version of the LTM app can be found on the Google Play Store.
Before you can use Screen Brightness Management, the LTM app must be given permission to change system settings. You may be guided through this step during the install, but here are the steps on how to manually grant access in Android. Go into Apps in the mobile device’s Settings. Find the entry for LTM. Click on “Apps that can change system settings” and grant LTM permission.
You also need to ensure that the time zone and time are set correctly. If the mobile device has auto brightness settings, this will also need to be turned off for Screen Brightness Management to work properly.
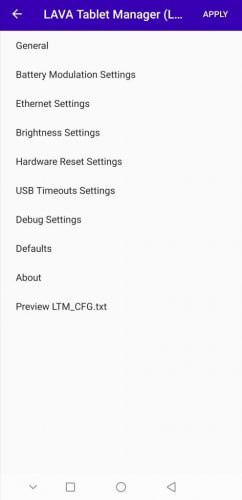
Once all that is done, you should be able to use Screen Brightness Management. Tap the LTM logo to launch the app. You can access Screen Brightness Management in the LTM Configuration Menu. It’s listed as Brightness Settings.

(If the LTM app doesn’t load when you tap on the icon, it is likely because the app is set to run in the background. LTM has two modes: Configuration Console, which is to be used during installation and Background Mode which is intended for regular use. This is so LTM doesn’t interfere with other apps running on the device. If it is in Background Mode, it will need to be switched back to Configuration Console before you can alter the settings. )
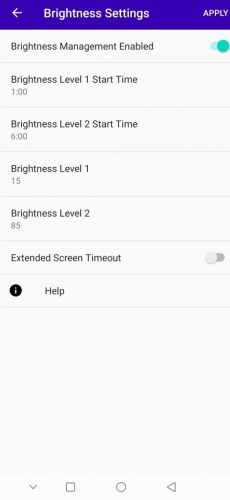
On the Brightness Settings screen, first tap the toggle switch next to Brightness Management Enabled to enable the feature and gain access to the settings below. As mentioned above, Screen Brightness Management lets you schedule a brightness level for two different times of day. Brightness Level 1 Start Time 1 corresponds to night-time operation and Brightness Level 2 Start Time 2 is for the day. Under the time settings, you can set Brightness Level 1 and Brightness Level 2, which correspond to the Time 1 and Time 2, respectively. For these settings, you choose a maximum brightness percentage (between 0 and 100).
At the bottom of the screen, there’s an additional toggle switch that lets you turn on Extended Screen Timeout. This setting keeps the display on for 24.8 days, once the device recognizes LAVA hardware. The current screen timeout gets displayed in the LTM Status window as most mobile devices can’t report a value that large.

LTM automatically generates a “toast” message (a small pop-up) every seven days to keep the screen awake if there is no user interaction. However, if the display is allowed to time out, the “toast” message may not be able to wake it back up. Extended Screen Timeout needs the same permissions to change systems settings as LTM Brightness management does.
That’s the basics on how to set up and configure Screen Brightness Management in the LTM app. If you want to know more about our SimulCharge adapters, check out our website.
